2012/07/20
2012/07/17
Backup Computer – How to Copy System Files to Hard Drive
Regular computer backup is very important to protect your data and works. There are various data backup options. You can choose to back up computer by Back Up utility provided by Microsoft, other PC backup software, backup to CDs, backup to removable hard drives, or more. Among those, to use an external hard drive to store your PC data is a good choice. It is very simple. Let’s explain how to copy system files to hard drive step by step.
Guide on how to copy system files to hard drive
Step 1. Read hard drive manual.
Take out your hard drive and read its manual carefully for any special instructions that must be finished before connecting your hard drive to PC.
Step 2. Install the driver for hard drive properly.
Install the drivers and required software bundled with your device. Make sure your hard drive has been connected with your computer successfully.
Step 3. Plug in the external power source if your external hard drive needs
If your external hard drive requires more power than what can be delivered by USB, plug it into an electrical outlet with the AC power adaptor which will come with your external hard drive.
Step 4. Connect your external hard drive with your computer via USB
Step 5. Wait till your device is recognized and initialized.
Step 6.On Windows computer, your external hard drive will pop up as another hard drive in My Computer area.
Step 7. Prepare the files or folders you want to back up, copy and paste them or drag them directly onto your external hard drive.
2012/07/12
How to download YouTube videos to iPhone 4 using BlazeVideo iPhone Video Converter
Today, for iPhone fans, watching YouTube videos on iPhone is very easy. Just follow the simple steps below to learn how to download YouTube videos to iPhone, iPhone 3G, iPhone 3GS, iPhone 4. Only few mouse clicks are enough!
Download YouTube videos to iPhone 4 Step 1: Start the video to iPhone 4 downloader software.
Download BlazeVideo iPhone Video Converter, install it and run it.
Download YouTube videos to iPhone 4 Step 2: Online download YouTube videos quickly.
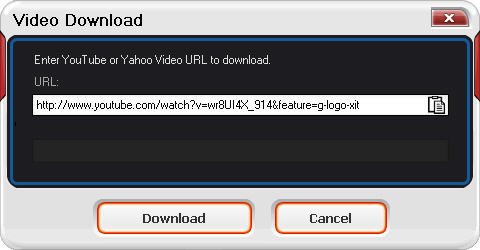
Click “YouTube” button on BlazeVideo iPhone Video Converter to turn to “Video Download” window:
Download YouTube videos to iPhone 4 Step 3: Convert downloaded YouTube FLV videos to iPhone 4.
Drop down to choose “iPhone4” in “Profile” tab and click “Start” button to convert the downloaded FLV video to MP4 for iPhone 4 instantly.
2012/07/06
Simple Guide to Convert DVD to iPod – Main Movie
iPod family has quite a lot of members: iPod shuffle, iPod nano, iPod classic, iPod touch and each series has several generations. Among them, classic and touch feature video playback function. For the portability and convenience, people like to watch movies on iPod. Unfortunately, not all the formats can be used on iPod.
I’m sure there are many programs out there nowadays that will convert files to iPod format. And here is one – Aviosoft DVD to iPod Converter. It can convert DVD to iPod at fast speed and with high quality. The Main Movie mode lets you convert only the longest title of a DVD to iPod, remove all unwanted intros, menus, sound tracks, etc.
Below is the step by step tutorial showing you how to convert main movie to iPod classic and touch.
Transfer DVD Main Movie to iPod Guide
The tool you will need is DVD to iPod Converter. Download here, install it on Windows and follow the below detailed steps.
Step 1. Import DVD Movie
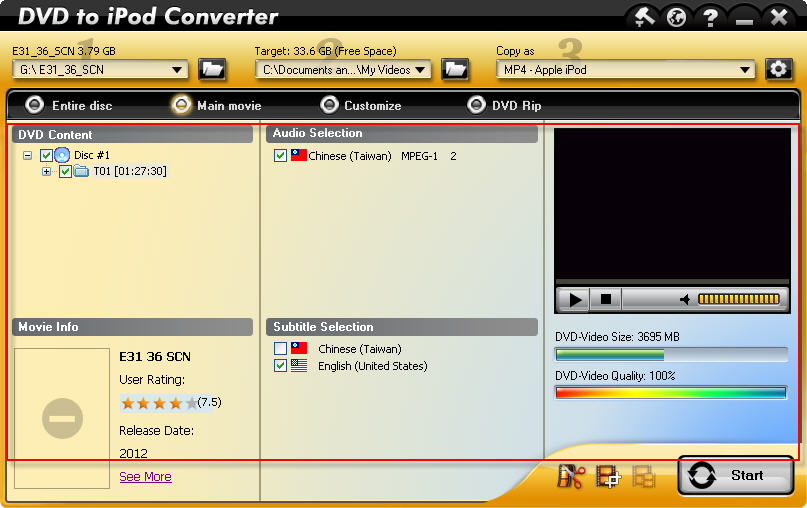
After launching the converter, insert the DVD into DVD drive, the converter will auto read the disc and display DVD information.

Step 2. Set Output
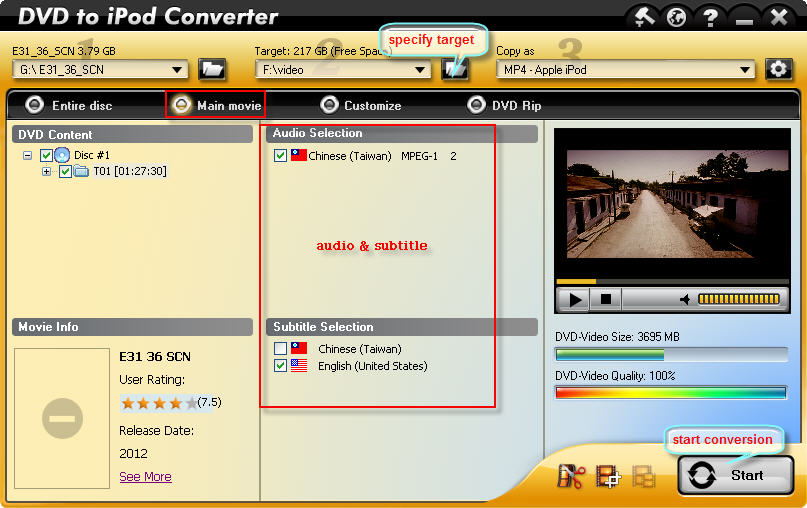
Specify a target folder to save converted MP4 file. Choose audio and subtitle that you want to keep.
Step 3. Start to Convert
Now you can click the “Start” button to start ripping DVD main movie to your iPod.

Step 4. Sync the Output Files to iPod
Open iTunes, click “File” on the main menu. From the drop-down list, select “Add File to Library” or “Add Folder to Library”. And now you can put the converted files or folder to the iTunes Library. Connect your iPod nano to PC and now you can transfer the converted videos to your iPod nano with the sync of iTunes.
2012/07/02
How to Copy Main Movie from a DVD to iPad 2
As one of the most popular portable devices in current life, it does not mean that people can enjoy all videos on iPad 2. That is to say, you need to convert the videos through some converters at first. In this article, we will show you how to copy main movie from a DVD to iPad 2 compatible format, thus you can play DVD main movie on iPad 2 anywhere at anytime.
Step 1: Install a DVD to iPad converter software
Hundreds of thousands of downloads tell us the BlazeVideo DVD Copy is the best program to convert DVD to iPad.
Step 2 Select iPad 2 as output device
After launching the DVD to iPad 2 converter software, insert the DVD disc to your computer drive. Your DVD information will be loaded automatically. Select “Movie File” in the drop down list of “Copy as” tab, and then choose iPad 2 as output device.
BlazeVideo DVD Copy software provides with several output MP4 resolutions for playback on iPad 2 even including the ones for iPad 2 HD. You are also allowed to customize the settings by clicking the “Setting” button: change the resolution, bitrate, frame rate in video and format, bitrate, sample rate, channel in audio. You can decide which works best with your iPad 2 device.
Step 3 Choose Main Movie as copy mode
This DVD to iPad 2 ripper tool has 4 DVD copy modes for your choice: Entire Disc, Main Movie, Customize, Split Disc. In this article, we mainly show how to convert the main movie from a DVD disc to iPad 2.
Step 4 Rip DVD to iPad 2 compatible format
By now it is time to convert the main movie of a DVD to iPad 2 supported format by clicking the “Start” button.
Step 5 Add the movie in iTunes and transfer it to iPad 2
iTunes is such a tool to help us transfer the converted DVD movie to iPad 2. If your iPad 2 is not connected already, please connect and transfer the movies from iTunes. Surely, if you want to move iPad 2 music and movies back to computer or iTunes, try iPad Transfer software.
Step 6 Play DVD on iPad 2 for enjoyment
Now, open your iPad 2 and play the DVD movie.
Subscribe to:
Comments (Atom)

